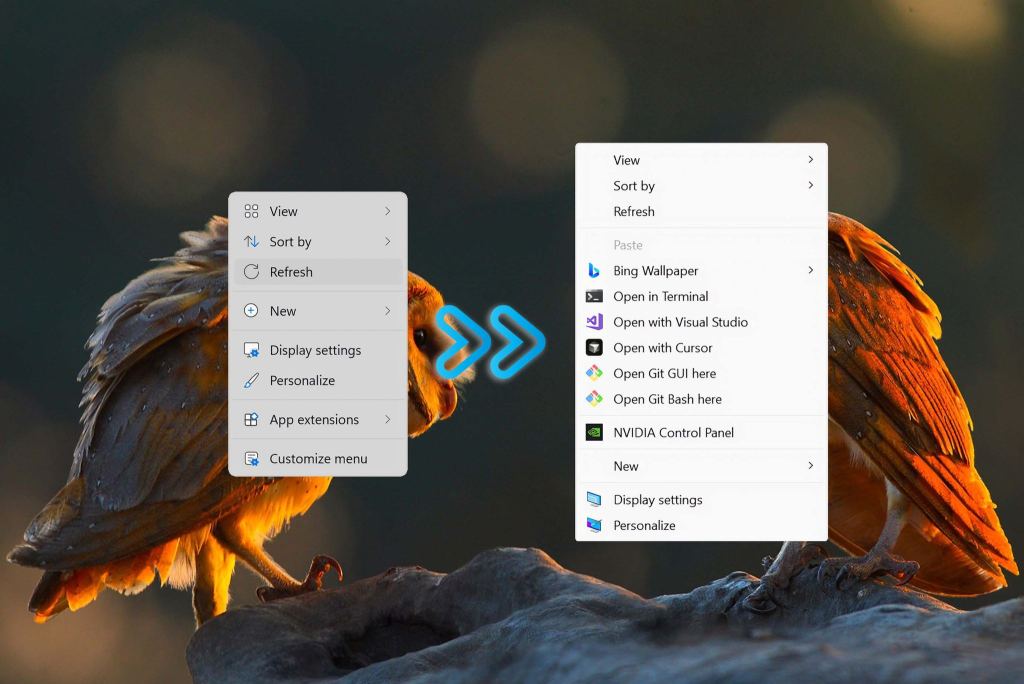
Update KB5132061 breaks the old Registry trick, but you can still restore the familiar context menu with a new command, and you don't need admin rights.
- November's security update (KB5132061) disables the old Registry trick. You now need a new command that writes two CLSID keys instead of one.
- Run the commands in a standard Command Prompt (no administrator rights), then stop and restart Windows Explorer. That's it.
- Tested on Windows 11 build 26300.9974, where it worked as expected.
- Undo the change with a reg delete command for the two corresponding keys.
- Editing the Registry is risky, so back up your system first, and keep in mind that future updates may break this method again.
Table of Contents
What happened to the old Registry trick
Windows 11 introduced a redesigned right-click context menu that looks cleaner and more modern. The trade-off is that many older options, third-party app integrations, and advanced actions are tucked behind "Show more options." To see everything, you have to click an extra step or use Shift + right-click or Shift + F10. For anyone who works with files and folders regularly, that is a redundant action repeated all day. The usual way to bring the old menu back has been a Registry edit, but November's security update (KB5132061) changed how that trick works, so you now need an updated command to make it work again.
It's easy to see why this frustrates a lot of users. The right-click menu is something Windows users have built muscle memory around across many generations of the OS, and they use it almost by reflex. Yet the new version puts the most-used items behind a collapsed menu, even though the people who need the full menu most are those working with files, scripts, and extensions from other apps. When a habit that works well is replaced by a less convenient one, and keeping it means relying on a Registry trick, feeling forced into a workflow is a fair reaction. The annoyance doubles each time a Microsoft update breaks the trick again, as it did here, leaving users to hunt for another way to get something they used to have out of the box.
How to restore the old menu after KB5132061
This method runs in a standard Command Prompt. The key point is that you don't need to run it with administrator rights. Open Start, search for Command Prompt, and click the first result. Then run the three commands below in order, pressing Enter after each. The first command adds two CLSID keys to the current user's Registry, the second stops Windows Explorer, and the third restarts it so the change takes effect.
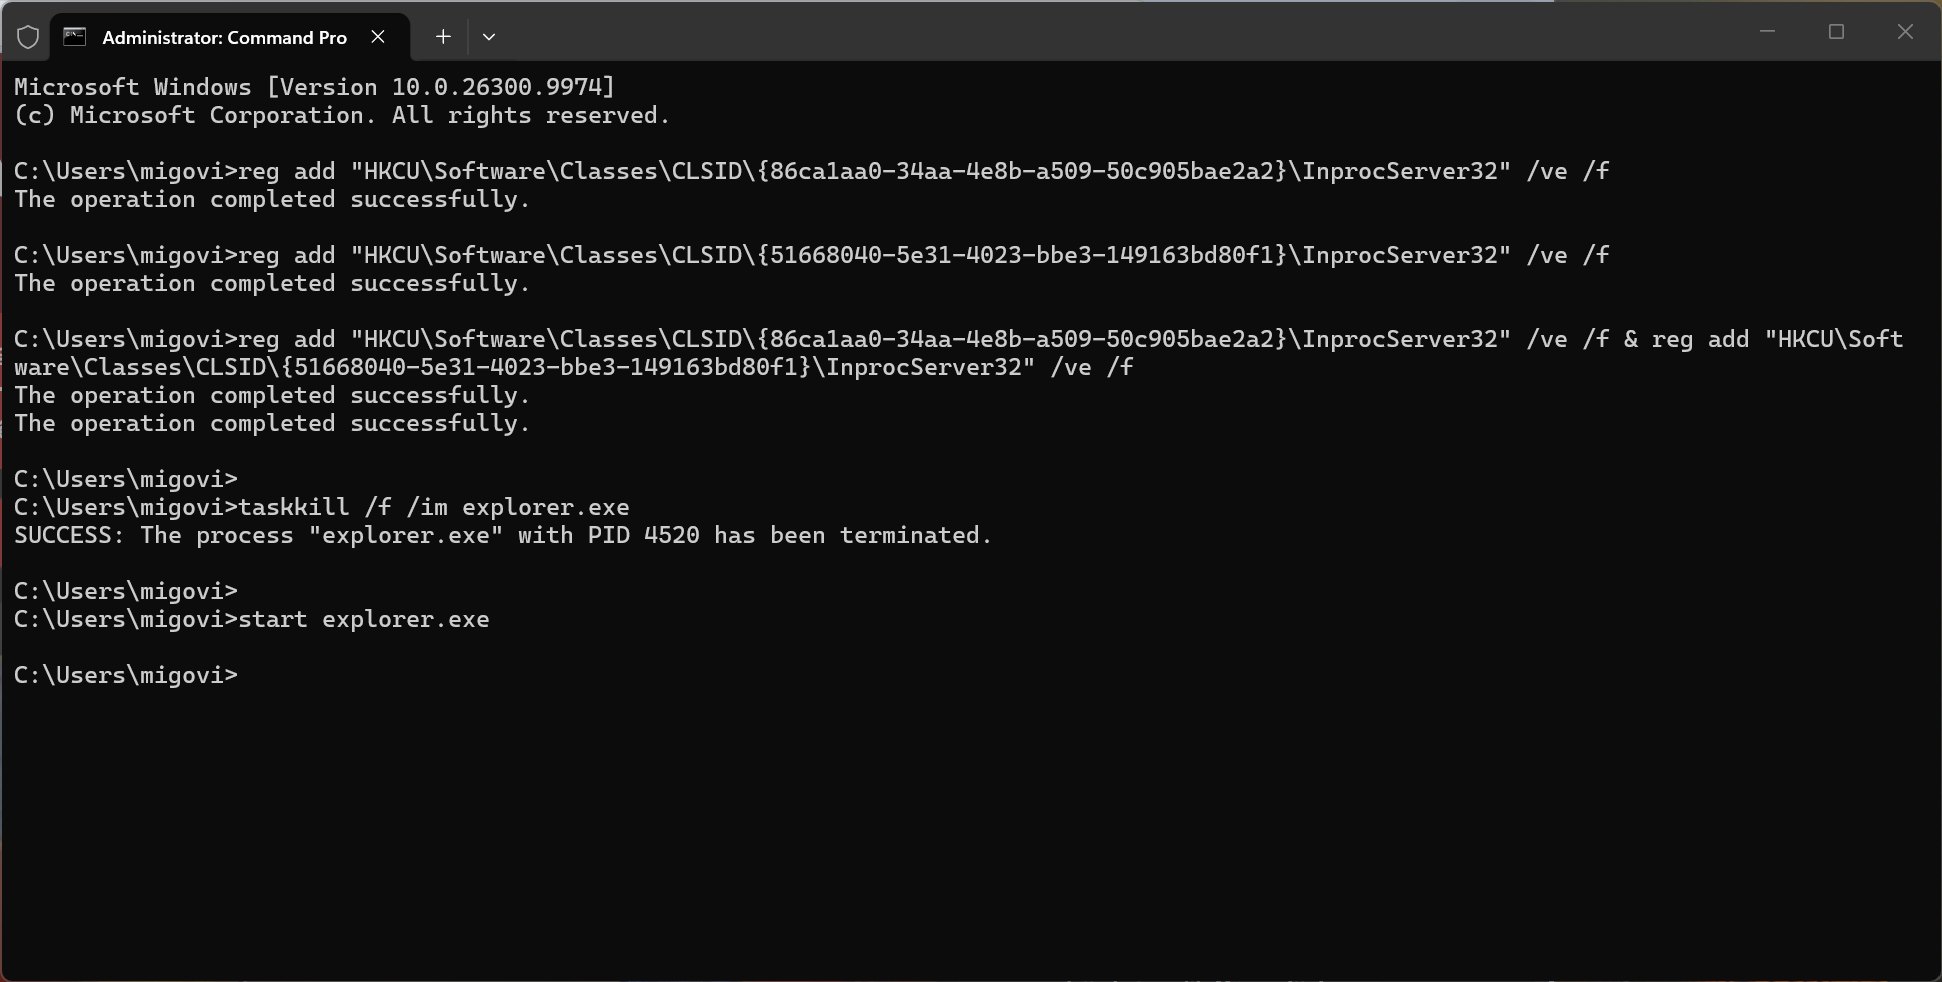
Once that's done, right-clicking in File Explorer brings up the old menu, even on a PC with November's update installed. We tested this on Windows 11 build 26300.9974, and it worked as expected. To go back to the new menu, repeat the steps above, but replace the first command with one that deletes the two keys you just created:
The old method may still work
If you prefer to make the change by hand, you can use Registry Editor. Open Start, search for regedit, and navigate to HKEY_CURRENT_USER\SOFTWARE\CLASSES\CLSID. Right-click the CLSID key and create a new key named {86ca1aa0-34aa-4e8b-a509-50c905bae2a2}. Inside it, create a subkey named InprocServer32, then double-click the (Default) value and leave the string empty before clicking OK. Leaving it empty is important: if you don't open the value and save it as blank, the key may not work, and you may end up needing to restart your PC. To revert, delete the {86ca1aa0-34aa-4e8b-a509-50c905bae2a2} key along with everything inside it.

The other option uses Command Prompt with administrator rights: right-click the search result and choose Run as administrator. Then run the command below, followed by the two taskkill and start explorer.exe commands from the section above. To undo it, use reg delete on this same key. Because November's update changed how the original trick works, if KB5132061 is installed and neither of these methods works, go back to the two-key command from the previous section.
Before you edit the Registry
Editing the Registry incorrectly can cause serious problems, so make sure you understand what you're doing and back up your entire system before you start. Some users have also reported issues after following these steps, and later updates or your PC's configuration may no longer be compatible, so weigh the risks yourself.
On Microsoft's side, the company is working on reorganizing the right-click menu so users won't need any tricks to reach the classic design. It's fair to say the new menu has come a long way, with more customization options and easier access to frequently used actions, so for most users it's a perfectly fine choice. Even so, on PCs that regularly handle files, folders, scripts, and third-party apps, or depend on older shell extensions, the old context menu is still easier to work with, and the methods in this article are enough to keep it.
That a familiar trick stopped working right after a security update shows that bringing back the old menu relies on Registry keys Microsoft can change at any time, so it isn't a long-term solution. If you mostly open, copy, and delete files, there's no harm in giving the new menu a little more time, since Microsoft is still reworking it. If your work depends on integrations from outside apps, the two-key registry command above is the neatest way to keep your old habits. In that case, save the reg delete command and create a restore point before each major update, so you know you can roll back when Windows changes its approach.
Reviewed by: Hero Association